User manual AUDIOVOX CD4610 Owners Manual
Lastmanuals offers a socially driven service of sharing, storing and searching manuals related to use of hardware and software : user guide, owner's manual, quick start guide, technical datasheets... DON'T FORGET : ALWAYS READ THE USER GUIDE BEFORE BUYING !!!
If this document matches the user guide, instructions manual or user manual, feature sets, schematics you are looking for, download it now. Lastmanuals provides you a fast and easy access to the user manual AUDIOVOX CD4610. We hope that this AUDIOVOX CD4610 user guide will be useful to you.
Lastmanuals help download the user guide AUDIOVOX CD4610.
Manual abstract: user guide AUDIOVOX CD4610Owners Manual
Detailed instructions for use are in the User's Guide.
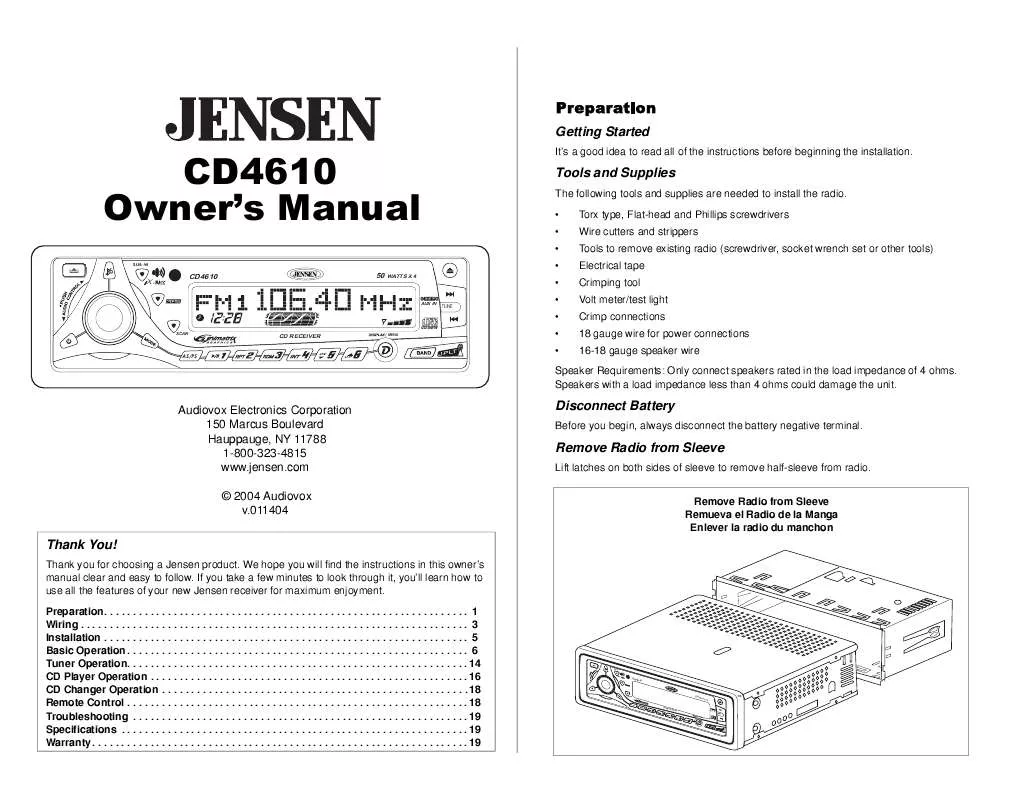
[. . . ] Preparation
Getting Started
CD4610 Owner's Manual
SUB-W
It's a good idea to read all of the instructions before beginning the installation.
Tools and Supplies
The following tools and supplies are needed to install the radio. · · · · Torx type, Flat-head and Phillips screwdrivers Wire cutters and strippers Tools to remove existing radio (screwdriver, socket wrench set or other tools) Electrical tape Crimping tool Volt meter/test light Crimp connections 18 gauge wire for power connections 16-18 gauge speaker wire
X
CD4610
50 WATTS X 4
·
AUX IN
TUNE
· · · ·
CD TEXT
CD-R/RW
SCAN SCAN
CD RECEIVER
DN
/ MENU
AS/PS
UP
Speaker Requirements: Only connect speakers rated in the load impedance of 4 ohms. Speakers with a load impedance less than 4 ohms could damage the unit.
Audiovox Electronics Corporation 150 Marcus Boulevard Hauppauge, NY 11788 1-800-323-4815 www. jensen. com © 2004 Audiovox v. 011404
Disconnect Battery
Before you begin, always disconnect the battery negative terminal.
Remove Radio from Sleeve
Lift latches on both sides of sleeve to remove half-sleeve from radio. Remove Radio from Sleeve Remueva el Radio de la Manga Enlever la radio du manchon
Thank You!
Thank you for choosing a Jensen product. [. . . ] Animation/Opération du menu (continué)
Affichage Horloge sélectionnable
Lorsque la fonction affichage horloge sélectionnable est activée, l'horloge et la note d'accueil par défaut apparaîtront sur l'affichage lorsque la radio est en arrêt mais branché au fil d'allumage. "CLK ON LCD On" sera le réglage par défaut pour cette option. Pour que l'horloge et la note d'accueil ne soient pas affichés lorsque l'appareil n'es pas en marche, tournez le contrôle volume pour sélectionner "CLK ON LCD Off".
Horloge Sans Clef
Horloge sans clef vous permet de regarder le temps en appuyant sur simplement DISPLAY (D). L'horloge et l'illumination resteront actives pendant cinq secondes, puis s'éteignent. Bouton Puissance Allumage Priorité
Par défaut, le bouton de la puissance (LED rouge) restera illuminé quand l'unité est arrêtée, aussi long que l'allumage demeure dessus. Le bouton LED de puissance est un dispositif (rouge) simple de couleur et il ne changera pas des couleurs quand changeant la couleur de l'affichage.
8. Note d'accueil
Lorsque l'appareil est en marche, une de ces trois salutations sera affichée selon l'heure du jour : Good Morning, Good Afternoon or Good Evening. Lorsque l'appareil est en arrêt, mais l'allumage reste en marche, l'affichage à cristaux liquides va défiler à travers les messages suivants si la fonction affichage horloge sélectionnable est activée: Radio Off, Visit us at Jensen. com, Enjoy Driving and Have a Nice Trip. Lorsque l'allumage est en arrêt, le message "See you!Have a nice day!" sera affiché avant que l'appareil ne s'éteigne.
12
CD4610 Basic Operation (continued)
9. Detaching the Front Panel
To detach the front panel, press the front panel release button (9), which will release the front panel. Grasp the edge of the front panel, and pull it to release. When the front panel is removed, it should be stored carefully to protect it from dirt and damage.
Operación Básica (continuado)
9. Liberar el Panel Delantero
Para liberar el panel delantero, presione el botón de liberar el panel delantero (9), lo cual automáticamente bajará el panel delantero. Tome el borde del panel delantero y jálelo para liberarlo completamente. Cuando el panel delantero se quita, debe ser guardado con cuidado para protegerlo del polvo y de otros daños.
10. Reattaching the Front Panel
To reattach the panel, make sure there is no dust or dirt on the electrical terminals on the back of the panel, as this could cause intermittent operation or other malfunctions. Slip the front panel right edge into position first, then rotate the left side of the front panel into position and press firmly into place.
10. Colocando nuevamente el panel delantero
Para colocar nuevamente el panel delantero, asegúrese que no haya polvo o suciedad en las terminales eléctricas en la parte trasera del panel, pues esto puede causar operación Deslice el borde de la derecha de panel delantero en la posición primero, en seguida rotan el lado izquierdo del panel delantero en la posición y presione firmemente en lugar.
11. Reset
After releasing the front panel, use a pencil (or any non-metallic object) to press and hold RESET for five seconds.
11. Reajuste
Use la punta de un lápiz (u otro objeto no metálico) para presionar RESET por cinco segundos.
12. Remove Radio From Dash
To remove the radio from the dash, detach the front panel and remove the trim ring by gently pulling up in the middle to release the plastic snaps. [. . . ] Appuyez sur RESET, insérez le disque et essayez. Appuyez sur RESET, insérez le disque et essayez. Le disque peut être endommagé ou sale. Vérifiez l'installation et la bande de fixation, puis solidifiez au besoin.
Amplificateur
Puissance totale du système . [. . . ]
DISCLAIMER TO DOWNLOAD THE USER GUIDE AUDIOVOX CD4610 Lastmanuals offers a socially driven service of sharing, storing and searching manuals related to use of hardware and software : user guide, owner's manual, quick start guide, technical datasheets...manual AUDIOVOX CD4610


