User manual FUTABA MPDX-1
Lastmanuals offers a socially driven service of sharing, storing and searching manuals related to use of hardware and software : user guide, owner's manual, quick start guide, technical datasheets... DON'T FORGET : ALWAYS READ THE USER GUIDE BEFORE BUYING !!!
If this document matches the user guide, instructions manual or user manual, feature sets, schematics you are looking for, download it now. Lastmanuals provides you a fast and easy access to the user manual FUTABA MPDX-1. We hope that this FUTABA MPDX-1 user guide will be useful to you.
Lastmanuals help download the user guide FUTABA MPDX-1.
Manual abstract: user guide FUTABA MPDX-1
Detailed instructions for use are in the User's Guide.
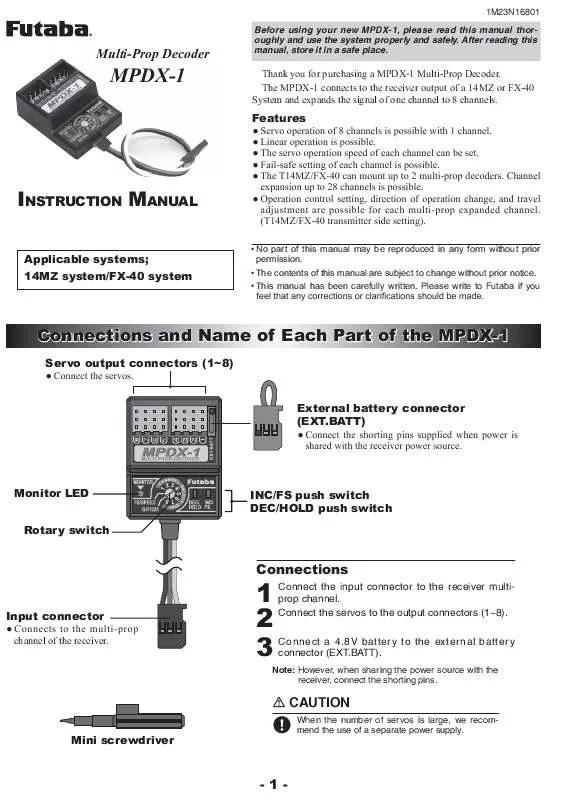
[. . . ] 1M23N16801 Before using your new MPDX-1, please read this manual thoroughly and use the system properly and safely. After reading this manual, store it in a safe place.
Multi-Prop Decoder
MPDX-1
Thank you for purchasing a MPDX-1 Multi-Prop Decoder. [. . . ] If the software is a version predating the above, update the 14MZ software by downloading the public update file from the Futaba dealer web site.
Reverse setting:
Open the reverse setup window of the linkage menu, and push the SET button of the channel with multiprop set.
1
MZ
expanded channel. Operation control setting/Direction of operation reversal/ Travel adjustment
*However, mixing cannot be set at a multi-prop channel.
The reverse setup window of the multi-prop channel appears. Switch between "Normal" and "Reverse" by pushing the SET button of the multi-prop channel you want to reverse.
2
Multi-prop function assignment
Travel adjustment:
Open the end point (ATV) window of the linkage menu and push the "MP CH" button of the channel with multi-prop set.
1
Operation control setting:
1
Open the operation setup window by pushing the "MP CH" button of the channel with multi-prop set.
The end point (ATV) setup window of the multiprop channel opens. Press the display button (left or right or up and down can be adjusted individually) of the channel whose travel you want to adjust, and adjust the rate by using the adjustment buttons at the bottom.
2
2 3
Open the control selection window by pushing the button of the multi-prop channel to be set. Select the control you want to operate.
-2-
MPDX-1 setting
Rotary switch
operation speed setting mode
INC/FS push switch
pushing pushing
DEC/HOLD push switch
pushing
Operation monitor indicator LED (MONITOR)
Rotary switch position Off FS/HOLD mode On Slow blink
pushing
FS/SPEED 1-8 (In FS/HOLD setting mode) 1-8 (In SPEED setting mode) G3/1024
Monitor LED state Intermittent Intermittent blink double blink Single blink SPEED setting mode
HOLD F/S At switching of rotary SPEED SPPED SPEED SPEED switch setting setting setting setting minimum maximum 4 or less 5 or greater PCMG3 PPM PCM1024 mode mode mode Fast blink: At FS operation, receive data error, or backup error
CAUTION
Always use the miniature screwdriver supplied to operate the MPDX-1 rotary switch and push switches. *Do not apply excessive force while operating.
Set the rotary switch to the channel # you want to set to the F/S mode or HOLD mode. When you want to set the channel to the F/S mode, move the servo to the F/S operation position at the transmitter side and push the "INC/FS" switch.
3
*When setting is complete, the LED lights.
Operation mode setting
When you want to set the channel to the HOLD mode, press the "DEC/HOLD" switch.
*When setting is complete, the LED goes off.
1 2
Set the operation mode to match the mode of the receiver used. Set the rotary switch to the "G3/1024" position. Switch the mode to match the type of receiver. (PCM-G3, PCM1024, PPM mode).
Servo speed setting
*Each time the "INC/FS" (or "DEC/HOLD") push switch is pushed for 1 second, the PCM-G3, PCM1014, and PPM mode is alternately selected. When the LED is off, the MPDX-1 is in the PCM-G3 mode, when the LED blinks slowly, the MPDX-1 is in the PCM1024 mode, and when the LED lights steadily, the MPDX-1 is in the PPM mode.
1 2 3
Set the rotary switch to the "FS/SPEED" position. Push the "INC/FS" (or "DEC/HOLD") push switch to slowly blink the LED.
F/S mode/HOLD mode setting
*Each time the switch is pressed, the LED toggles between off and slow blink.
F/S mode: Servo moves to a preset position. [. . . ] Procedures which may lead to a dangerous condition or cause death or serious injury to the user if not carried out properly, or procedures where the probability of superficial injury or physical damage is high. Procedures where the possibility of serious injury to the user is small, but there is a danger of injury, or physical damage, if not carried out properly.
Special Markings; Pay special attention to the safety at the parts of this manual that are indicated by the following marks.
[Symbol] ; Prohibited ; Mandatory
©FUTABA CORPORATION
2006, 05
(1)
-4- [. . . ]
DISCLAIMER TO DOWNLOAD THE USER GUIDE FUTABA MPDX-1 Lastmanuals offers a socially driven service of sharing, storing and searching manuals related to use of hardware and software : user guide, owner's manual, quick start guide, technical datasheets...manual FUTABA MPDX-1


