User manual LIFT-MASTER 78LM
Lastmanuals offers a socially driven service of sharing, storing and searching manuals related to use of hardware and software : user guide, owner's manual, quick start guide, technical datasheets... DON'T FORGET : ALWAYS READ THE USER GUIDE BEFORE BUYING !!!
If this document matches the user guide, instructions manual or user manual, feature sets, schematics you are looking for, download it now. Lastmanuals provides you a fast and easy access to the user manual LIFT-MASTER 78LM. We hope that this LIFT-MASTER 78LM user guide will be useful to you.
Lastmanuals help download the user guide LIFT-MASTER 78LM.
Manual abstract: user guide LIFT-MASTER 78LM
Detailed instructions for use are in the User's Guide.
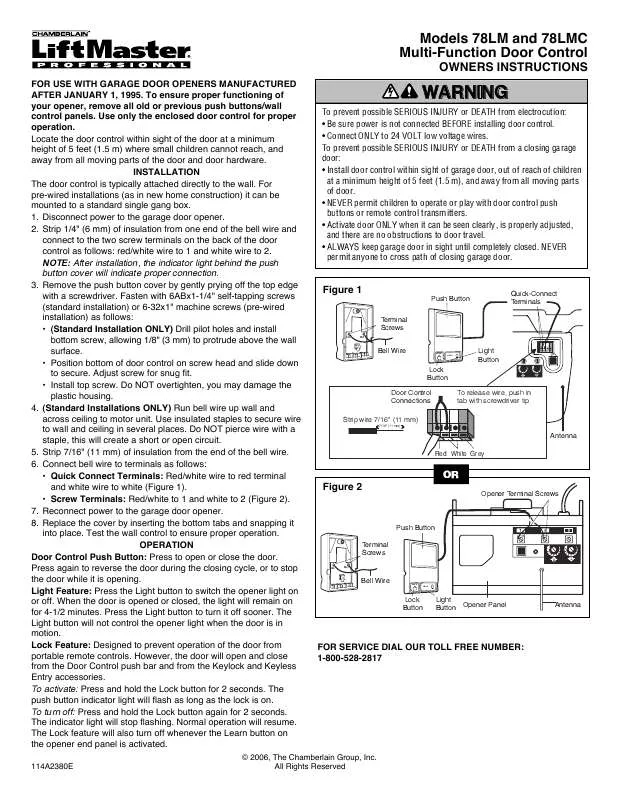
[. . . ] Fasten with 6ABx1-1/4" self-tapping screws (standard installation) or 6-32x1" machine screws (pre-wired installation) as follows: · (Standard Installation ONLY) Drill pilot holes and install bottom screw, allowing 1/8" (3 mm) to protrude above the wall surface. · Position bottom of door control on screw head and slide down to secure. Do NOT overtighten, you may damage the plastic housing. (Standard Installations ONLY) Run bell wire up wall and across ceiling to motor unit. [. . . ] The Lock feature will also turn off whenever the Learn button on the opener end panel is activated.
Models 78LM and 78LMC Multi-Function Door Control WARNING
OWNERS INSTRUCTIONS
CAUTION
WARNING
To prevent possible SERIOUS INJURY or DEATH from electrocution: · Be sure power is not connected BEFORE installing door control. · Connect ONLY to 24 VOLT low voltage wires. To prevent possible SERIOUS INJURY or DEATH from a closing garage door: · Install door control within sight of garage door, out of reach of children at a minimum height of 5 feet (1. 5 m), and away from all moving parts of door. · NEVER permit children to operate or play with door control push buttons or remote control transmitters. · Activate door ONLY when it can be seen clearly, is properly adjusted, and there are no obstructions to door travel. · ALWAYS keep garage door in sight until completely closed. NEVER permit anyone to cross path of closing garage door.
Figure 1
Push Button Terminal Screws
RED WHT
Quick-Connect Terminals
Bell Wire
LOCK
LIGHT
Light Button
Lock Button Door Control Connections Strip wire 7/16" (11 mm)
7/16" (11 mm)
To release wire, push in tab with screwdriver tip
Antenna Red White Grey
OR Figure 2
Opener Terminal Screws
Push Button Terminal Screws
RED WHT
Bell Wire
LOCK
LIGHT
Lock Button
Light Button Opener Panel
Antenna
FOR SERVICE DIAL OUR TOLL FREE NUMBER: 1-800-528-2817
114A2380E
© 2006, The Chamberlain Group, Inc. All Rights Reserved
AVERTISSEMENT AVERTISSEMENT
À UTILISER AVEC LES OUVRE-PORTES DE GARAGE FABRIQUÉS APRÈS LE 1er JANVIER 1995. Pour vous assurer du bon fonctionnement de votre ouvre-porte de garage, retirez tous les vieux panneaux muraux ou boutons de contrôle précédents. N'utilisez que le bouton de contrôle inclus pour un bon fonctionnement.
Modèles 78LM et 78LMC AVERTISSEMENT Commande de porte multifonction
NOTICE D'UTILISATION
ATTENTION
AVERTISSEMENT
Pour prévenir d'éventuelles BLESSURES GRAVES ou LA MORT par suite d'électrocution : · S'assurer que le courant est coupé AVANT de poser la commande de porte. · Raccorder UNIQUEMENT à des fils basse tension 24 V. Pour prévenir d'éventuelles BLESSURES GRAVES ou LA MORT par suite d'une porte de garage qui se ferme : · Poser la commande de porte en vue de la porte de garage, hors de la portée des enfants à une hauteur minimum de 5 pieds (1, 5 m), et à l'écart de toutes les pièces mobiles de la porte. · Ne JAMAIS laisser des enfants faire fonctionner les boutons-poussoirs de la commande de porte ou les émetteurs de la télécommande, ni jouer avec ceux-ci. · Actionner la porte UNIQUEMENT lorsqu'on la voit clairement, qu'elle est bien réglée et que rien ne gêne la course de la porte. · TOUJOURS garder la porte de garage en vue jusqu'à ce qu'elle soit complètement fermée. Ne JAMAIS laisser personne croiser le chemin d'une porte de garage qui se ferme.
Poser la commande murale dans un endroit où on pourra la voir de la porte, à au moins 5 pieds (1, 5 m) du sol, là où les enfants ne pourront pas l'atteindre et loin de toutes les pièces mobiles et fixations de la porte. INSTALLATION La commande de porte est généralement posée directement au mur. Dans le cas d'installations précâblées (comme dans les habitations neuves), elle peut être posée sur un modèle standard de boîte électrique simple. Couper l'alimentation de l'ouvre-porte de garage. Enlever 1/4 po (6 mm) d'isolation à une extrémité du fil de sonnerie. Raccorder les deux bornes à vis à l'arrière de la commande de porte : le fil blanc/rouge sur 1 et le fil blanc sur 2. REMARQUE : Après l'installation, un témoin lumineux derrière le couvercle indiquera un branchement approprié. [. . . ] Appuyer sur le bouton d'éclairage (LIGHT) pour l'éteindre plus tôt. Le bouton d'éclairage (LIGHT) ne contrôle pas la lumière de l'ouvre-porte lorsque la porte est en mouvement. Élément de verrouillage : Conçu afin de prévenir le fonctionnement de la porte à l'aide des télécommandes à main. Cependant, la porte s'ouvrira et se fermera à partir de la commande de porte, de la serrure extérieure ou du système d'ouverture sans clé en accessoire. [. . . ]
DISCLAIMER TO DOWNLOAD THE USER GUIDE LIFT-MASTER 78LM Lastmanuals offers a socially driven service of sharing, storing and searching manuals related to use of hardware and software : user guide, owner's manual, quick start guide, technical datasheets...manual LIFT-MASTER 78LM


