User manual CHAMBERLAIN MHS QUICK START
Lastmanuals offers a socially driven service of sharing, storing and searching manuals related to use of hardware and software : user guide, owner's manual, quick start guide, technical datasheets... DON'T FORGET : ALWAYS READ THE USER GUIDE BEFORE BUYING !!!
If this document matches the user guide, instructions manual or user manual, feature sets, schematics you are looking for, download it now. Lastmanuals provides you a fast and easy access to the user manual CHAMBERLAIN MHS. We hope that this CHAMBERLAIN MHS user guide will be useful to you.
Lastmanuals help download the user guide CHAMBERLAIN MHS.
Manual abstract: user guide CHAMBERLAIN MHSQUICK START
Detailed instructions for use are in the User's Guide.
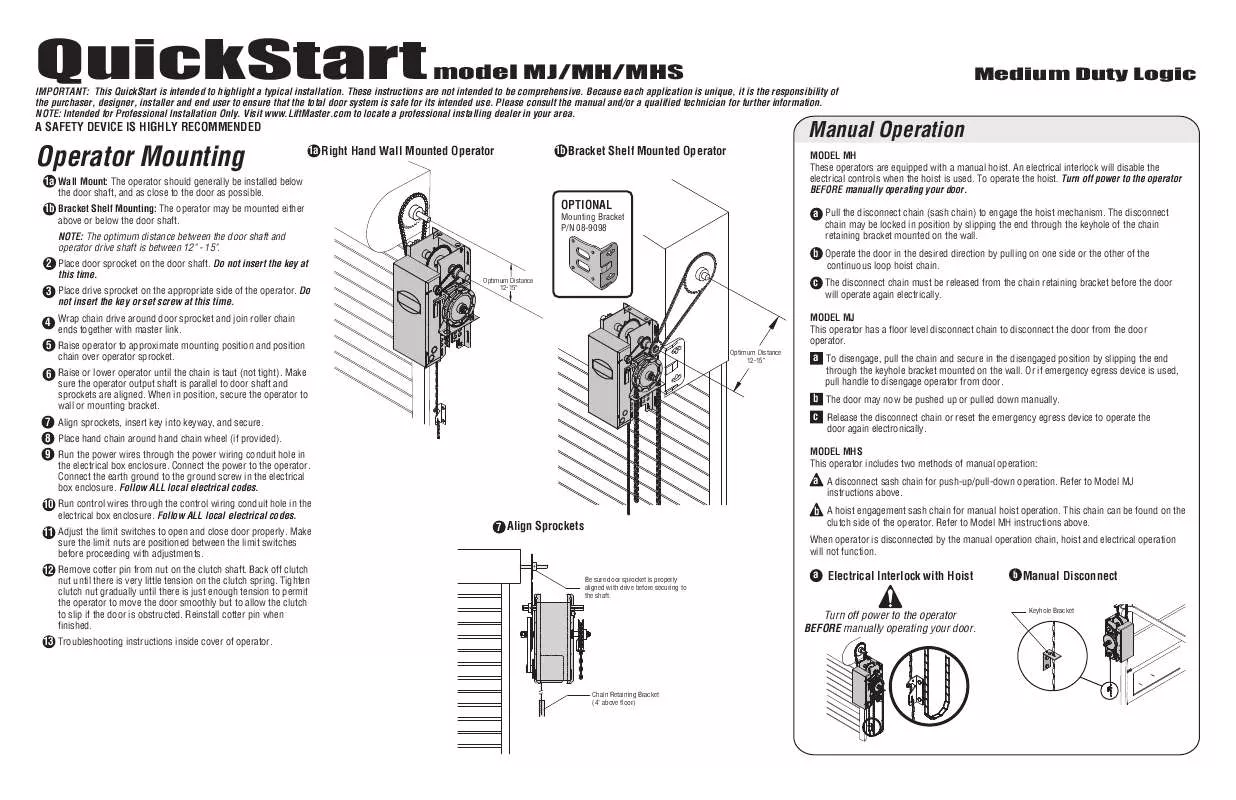
[. . . ] Do not insert the key at
this time.
b Operate the door in the desired direction by pulling on one side or the other of the
continuous loop hoist chain.
Optimum Distance 12-15"
3 Place drive sprocket on the appropriate side of the operator. Do
not insert the key or set screw at this time.
c The disconnect chain must be released from the chain retaining bracket before the door
will operate again electrically. MODEL MJ This operator has a floor level disconnect chain to disconnect the door from the door operator.
Optimum Distance 12-15"
4 Wrap chain drive around door sprocket and join roller chain
ends together with master link. chain over operator sprocket.
5 Raise operator to approximate mounting position and position 6 Raise or lower operator until the chain is taut (not tight). [. . . ] When operator is disconnected by the manual operation chain, hoist and electrical operation will not function.
Be sure door sprocket is properly aligned with drive before securing to the shaft.
11 Adjust the limit switches to open and close door properly. Make
sure the limit nuts are positioned between the limit switches before proceeding with adjustments.
12 Remove cotter pin from nut on the clutch shaft. Back off clutch
nut until there is very little tension on the clutch spring. Tighten clutch nut gradually until there is just enough tension to permit the operator to move the door smoothly but to allow the clutch to slip if the door is obstructed. Reinstall cotter pin when finished.
a Electrical Interlock with Hoist
b
Manual Disconnect
Keyhole Bracket
Turn off power to the operator BEFORE manually operating your door.
13 Troubleshooting instructions inside cover of operator.
Chain Retaining Bracket (4' above floor)
QuickStart
A SAFETY DEVICE IS HIGHLY RECOMMENDED
Push
for the model MJ/MH/MHS door operator
Medium Duty Logic
This QuickStart is intended to highlight a typical installation. These instructions are not intended to be comprehensive. Because each application is unique, it is the responsibility of the purchaser, designer, installer and end user to ensure that the total door system is safe for its intended use. Please consult the manual and/or a qualified technician for further information. NOTE: Intended for Professional Installation Only. Visit www. LiftMaster. com to locate a professional installing dealer in your area.
Timer to Close Programming
Timer to Close feature enables the operator to close the door after a preset time, adjustable from 5 to 60 seconds. A LiftMaster monitored safety device must be connected and unobstructed to activate this feature. See installation manual for LiftMaster monitored safety device selection and installation.
Timer to Close (TTC)
Direction Limit Nut Will Move During Travel
Timer To Close Button
TTC
D14 LED
Timer to Close feature enables the operator to close from the open limit after a preset time, adjustable from 5 to 60 seconds. Requires LiftMaster monitored safety device.
9 115 V PH. 1 Power Connection
LEARN
STOP
CL
CLO
11 Limit Switches
SAF
ETY
L1
L2
Power Wiring ONLY!
9
Power Wiring Knockout
POWER WIRING USE COPPER WIRE ONLY
14 AWG Minimum
Follow ALL local electrical codes
TO PROGRAM 1. Begin with door in fully closed position. Press and release the LEARN button (LED will light). Every press and release of the STOP button will add 5 seconds to the Timer to Close. Example: 30 second TTC = 6 presses of the STOP button. Press and release the TTC button to exit programming mode. The LED will flash once per 5 seconds of timer setting. [. . . ] Press and hold the button on the remote control until the LED flashes rapidly, then release to complete programming (LED will go out). Repeat steps 1 and 2 for additional remote controls.
© 2008, The Chamberlain Group Inc. All Rights Reserved
Electrical Box
Logic Board
D7 U4 D6
D5 D4
014A1030
TP1 C9 C20
J4 C32 R25
STOP
CLOSE OPEN
3-BUTTON REMOTE CONTROL TO OPERATE AS A WIRELESS 3-BUTTON CONTROL STATION NOTE: The feature will use 3 of the 20 memory channels in the operator. Press and hold the LEARN button (LED will light). [. . . ]
DISCLAIMER TO DOWNLOAD THE USER GUIDE CHAMBERLAIN MHS Lastmanuals offers a socially driven service of sharing, storing and searching manuals related to use of hardware and software : user guide, owner's manual, quick start guide, technical datasheets...manual CHAMBERLAIN MHS


