User manual HARMAN KARDON HD 750
Lastmanuals offers a socially driven service of sharing, storing and searching manuals related to use of hardware and software : user guide, owner's manual, quick start guide, technical datasheets... DON'T FORGET : ALWAYS READ THE USER GUIDE BEFORE BUYING !!!
If this document matches the user guide, instructions manual or user manual, feature sets, schematics you are looking for, download it now. Lastmanuals provides you a fast and easy access to the user manual HARMAN KARDON HD 750. We hope that this HARMAN KARDON HD 750 user guide will be useful to you.
Lastmanuals help download the user guide HARMAN KARDON HD 750.
You may also download the following manuals related to this product:
Manual abstract: user guide HARMAN KARDON HD 750
Detailed instructions for use are in the User's Guide.
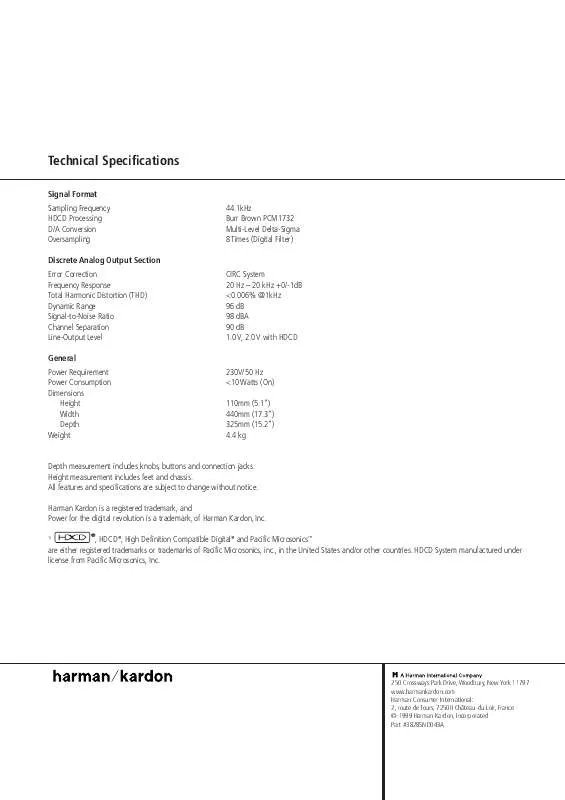
[. . . ] Technical Specifications
Signal Format Sampling Frequency HDCD Processing D/A Conversion Oversampling Discrete Analog Output Section Error Correction Frequency Response Total Harmonic Distortion (THD) Dynamic Range Signal-to-Noise Ratio Channel Separation Line-Output Level General Power Requirement Power Consumption Dimensions Height Width Depth Weight 230V/50 Hz <10 Watts (On) 110mm (5. 1") 440mm (17. 3") 325mm (15. 2") 4. 4 kg CIRC System 20 Hz 20 kHz +0/-1dB <0. 006% @1kHz 96 dB 98 dBA 90 dB 1. 0 V, 2. 0 V with HDCD 44. 1kHz Burr Brown PCM1732 Multi-Level Delta-Sigma 8 Times (Digital Filter)
Depth measurement includes knobs, buttons and connection jacks. Height measurement includes feet and chassis. All features and specifications are subject to change without notice. Harman Kardon is a registered trademark, and Power for the digital revolution is a trademark, of Harman Kardon, Inc. [. . . ] This jack may also be connected to the IR-Output jack of another compatible Harman Kardon component or a compatible IRsystem- remote product. You may also use the IR Sensor in the HD750 to send commands to other compatible remote controlled products. Connect the Remote IROut jack ¢ to the input of the other product or system.
©
Connect the power to a nonswitched AC wall outlet or to the accessory outlet on the rear of another audio device in your system and you are ready to go!NOTE: When using the accessory outlet on another product to power the HD750 make certain that it has the compatibility to power a device that draws at least 14 watts of current in addition to being able to handle the requirements of the other devices that may be plugged into the accessory outlets. If you use a "switched" outlet, it is important to remember that the host product must be turned on in order for the HD750 to operate.
INSTALLATION 9
Operation
Loading and Unloading Discs
To load a disc, first turn the unit on (if not so already) by pressing the Power Switch 1 on the front panel or the Power On button 1 on the remote, then press the Open/Close button $ F taking care to make certain that the space in front of the drawer is not obstructed. Note that if the drawer is blocked when attempting to open it, it will automatically stop the motor for opening the tray after 10 seconds and an ERROR message will appear in the front display to protect the mechanism. When the unit is turned off (to Standby), pressing any button on the front panel will turn the unit on. When Play button 4 9 on the front or on the remote is pressed, the unit will automatically turn on and start playing the disc actually loaded. Load the disc in the tray with the printed (label) side facing up. Make certain that the disc is centered in the tray. Either 12cm (5") or 8cm (3") discs may be used. When an 8cm disc is played, it should be carefully centered within the smaller ridges inside the cassette drawer. To remove a disc from the player, press the Open/Close button $ F. The drawer will open, allowing the disc to be removed. Disc Handling Notes When loading or unloading discs, it is best to hold them by the edges. While Compact Discs are very reliable, rough handling may damage them. Avoid scratching the bottom (non-printed) side of discs, or any handling which will leave fingerprints. To avoid damage to the disc and player, always seat discs so that they are centered in the tray. Do not lift the player while the disc tray is opening or closing, as this may cause the disc to unseat from the tray and possibly jam. Pressing the Open/Close button once a disc has been carefully seated will close the disc drawer while the message CLOSING will appear in the information display. As soon as the tray is closed the display will show the message TRACKING while the table of content (TOC) of the disc is read. Note that particulary with CD-RW discs this tracking may take some time due to the reflectibility and data structure different from normal discs. [. . . ] When you see these indicators, the entire disc or all programmed tracks will play through to the end, and then start again from the beginning. The disc will play continually until the Stop button 5 A is pressed. Repeat AB The HD750 may be programmed to repeat any section within a track, or a complete passage or program that includes material in a series of tracks. To program the unit for AB play, first locate the point on the disc where you wish to begin the repeated section. [. . . ]
DISCLAIMER TO DOWNLOAD THE USER GUIDE HARMAN KARDON HD 750 Lastmanuals offers a socially driven service of sharing, storing and searching manuals related to use of hardware and software : user guide, owner's manual, quick start guide, technical datasheets...manual HARMAN KARDON HD 750


 HARMAN KARDON HD 750 TECHNICAL SHEET (28 ko)
