Detailed instructions for use are in the User's Guide.
[. . . ] Installing the software
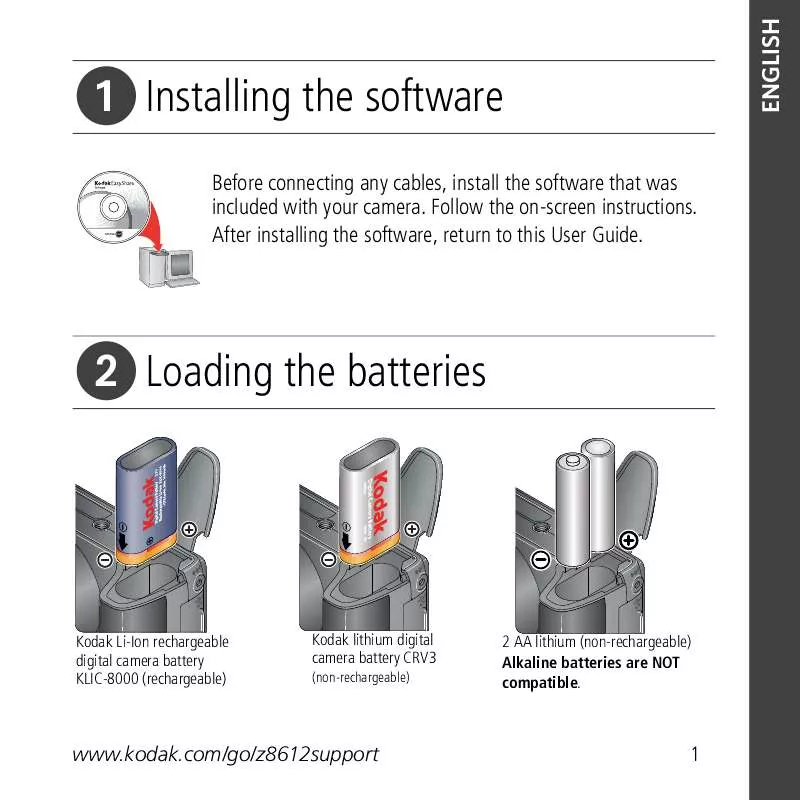
Before connecting any cables, install the software that was included with your camera. After installing the software, return to this User Guide.
Loading the batteries
Kodak Li-Ion rechargeable digital camera battery KLIC-8000 (rechargeable)
Kodak lithium digital camera battery CRV3
(non-rechargeable)
2 AA lithium (non-rechargeable) Alkaline batteries are NOT compatible.
www. kodak. com/go/z8612support
1
ENGLISH
ENGLISH
1
2
Attaching the strap
2
Turning on the camera
Note: After you turn off the camera, carefully push down the flash to close it.
www. kodak. com/go/easysharecenter
Setting the language, date/time
Language:
to change OK to accept
Date/Time:
to change for previous/next field OK to accept
www. kodak. com/go/z8612support
3
ENGLISH
ENGLISH
1
4
Taking a picture/video
Pictures Smart Scene mode 1 Videos Video mode
Framing marks
2 Press the Shutter button halfway to lock the focus. When the framing marks turn green, press the Shutter button completely down.
2 Press the Shutter button completely down and release. To stop recording, press and release the Shutter button again.
www. kodak. com/go/easysharecenter
Reviewing pictures/videos
Review previous/next picture/video
Transferring pictures/videos
USB cable
1 Turn off camera. [. . . ] 2 Press
to choose a tab: Review to view pictures/videos Edit to edit pictures/videos Setup for other camera settings to highlight a setting, then press the OK button.
3 Press
4 Choose an option, then press the OK button.
www. kodak. com/go/z8612support
17
Working with pictures/videos
Understanding the review icons
Pictures
Print tag Email tag Protected Favorite tag Review mode Selected picture
Picture number Image storage location Perfect Touch tech.
Tag Scroll arrows
Low battery
Videos
Email tag Protected Review mode Selected picture Video length Video number Image storage location
Tag Scroll arrows
Low battery
18
www. kodak. com/go/easysharecenter
3
Using the advanced features
Using the Menu button to change settings
NOTE: Some settings remain until you change them; others remain until you turn off the camera. 2 Press
to highlight a menu tab:
Capture for the most common picture-taking settings. Capture + for other picture-taking settings. Available only in PASM and Panorama modes. to highlight a setting, then press the OK button. for information about camera settings and options. Some capture modes
3 Press
4 Choose an option, then press the OK button. NOTE: Press the Info button offer limited settings.
www. kodak. com/go/z8612support
19
Using the advanced features
Using PASM modes
Use PASM modes when you want more control over your camera and pictures. Mode When to use
Program mode offers the ease of auto shooting with full access to all menu options. The camera automatically sets the shutter speed and aperture (f-stop) based on the scene lighting.
Press control
to
Exposure compensation (how much light enters the camera), flash compensation, and ISO Program speed Use Aperture Priority mode to control depth of Aperture, exposure compensation, flash field (the range of sharpness). The aperture compensation, and ISO speed Aperture setting may be affected by optical zoom. Priority
P
A S
Shutter Priority
M
Manual
Shutter Priority mode is primarily used to prevent blur when your subject is moving. The camera automatically sets the aperture for proper exposure. (To prevent blur, use a tripod for slow shutter speeds. ) Manual mode offers the highest level of creative control. (To prevent blur, use a tripod for slow shutter speeds. )
Shutter speed, exposure compensation, flash compensation, and ISO speed
Aperture, shutter speed, flash compensation, and ISO speed
NOTE: Settings you change in P, A, S, or M modes apply only to pictures taken in those modes. The settings, including Flash, are maintained for P, A, S, and M modes--even when you change modes or turn off the camera. Use Reset Camera (in the Setup menu) to reset P, A, S, or M mode to its default setting.
20
www. kodak. com/go/easysharecenter
Using the advanced features
Changing P, A, S, or M mode settings
Aperture Shutter speed
ISO speed Flash compensation Exposure compensation
1 Turn the Mode dial to P, A, S, or M. 2 Press to access available settings: Aperture--(also known as f-stop) control the size of the lens opening, which determines the depth of field.
Smaller f-stop numbers indicate a larger lens opening; good for low-light. Larger f-stop numbers indicate a smaller lens opening; keeps the main subject sharp; good for landscapes and well-lit conditions.
Shutter speed--control how long the shutter stays open. (Use a tripod for slow shutter speeds. ) Exposure Compensation--adjust the exposure. Contact your computer manufacturer if you have questions. If using this product in an airplane, observe all instructions of the airline. [. . . ] Remanufactured Products, parts and materials are warranted for the remaining warranty term of the original Product, or 90 days after the date of repair or replacement, whichever is longer. Limitations This warranty does not cover circumstances beyond Kodak's control. This warranty does not apply when failure is due to shipping damage, accident, alteration, modification, unauthorized service, misuse, abuse, use with incompatible accessories or attachments (such as third party ink or ink tanks), failure to follow Kodak's operation, maintenance or repacking instructions, failure to use items supplied by Kodak (such as adapters and cables), or claims made after the duration of this warranty. Kodak makes no other express or implied warranty for this product, and disclaims the implied warranties of merchantability and fitness for a particular purpose. [. . . ]


 KODAK Z8612 EXTENDED GUIDE (2222 ko)
