Detailed instructions for use are in the User's Guide.
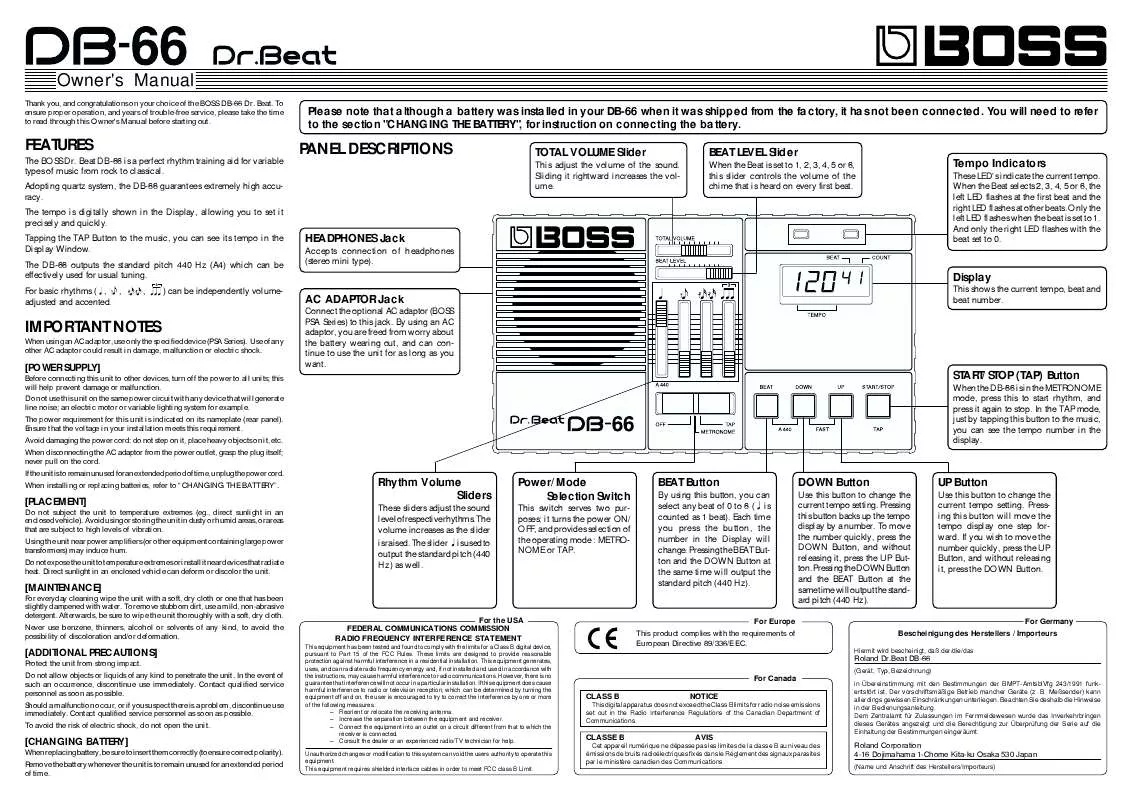
[. . . ] Sliding it rightward increases the volume.
BEAT LEVEL Slider
When the Beat is set to 1, 2, 3, 4, 5 or 6, this slider controls the volume of the chime that is heard on every first beat.
Tempo Indicators
These LED's indicate the current tempo. When the Beat selects 2, 3, 4, 5 or 6, the left LED flashes at the first beat and the right LED flashes at other beats. Only the left LED flashes when the beat is set to 1. And only the right LED flashes with the beat set to 0.
HEADPHONES Jack
Accepts connection of headphones (stereo mini type).
Display AC ADAPTOR Jack
Connect the optional AC adaptor (BOSS PSA Series) to this jack. [. . . ] To move the number quickly, press the DOWN Button, and without releasing it, press the UP Button. Pressing the DOWN Button and the BEAT Button at the same time will output the standard pitch (440 Hz).
UP Button
Use this button to change the current tempo setting. Pressing this button will move the tempo display one step forward. If you wish to move the number quickly, press the UP Button, and without releasing it, press the DOWN Button.
[MAINTENANCE]
For everyday cleaning wipe the unit with a soft, dry cloth or one that has been slightly dampened with water. To remove stubborn dirt, use a mild, non-abrasive detergent. Afterwards, be sure to wipe the unit thoroughly with a soft, dry cloth. Never use benzene, thinners, alcohol or solvents of any kind, to avoid the possibility of discoloration and/or deformation.
For the USA FEDERAL COMMUNICATIONS COMMISSION RADIO FREQUENCY INTERFERENCE STATEMENT
This equipment has been tested and found to comply with the limits for a Class B digital device, pursuant to Part 15 of the FCC Rules. These limits are designed to provide reasonable protection against harmful interference in a residential installation. This equipment generates, uses, and can radiate radio frequency energy and, if not installed and used in accordance with the instructions, may cause harmful interference to radio communications. However, there is no guarantee that interference will not occur in a particular installation. If this equipment does cause harmful interference to radio or television reception, which can be determined by turning the equipment off and on, the user is encouraged to try to correct the interference by one or more of the following measures: Reorient or relocate the receiving antenna. Increase the separation between the equipment and receiver. Connect the equipment into an outlet on a circuit different from that to which the receiver is connected. Consult the dealer or an experienced radio/TV technician for help. Unauthorized changes or modification to this system can void the users authority to operate this equipment. This equipment requires shielded interface cables in order to meet FCC class B Limit.
For Europe This product complies with the requirements of European Directive 89/336/EEC.
For Germany Bescheinigung des Herstellers / Importeurs
Hiermit wird bescheinigt, daß der/die/das
[ADDITIONAL PRECAUTIONS]
Protect the unit from strong impact. Do not allow objects or liquids of any kind to penetrate the unit. In the event of such an occurrence, discontinue use immediately. Contact qualified service personnel as soon as possible. Should a malfunction occur, or if you suspect there is a problem, discontinue use immediately. Contact qualified service personnel as soon as possible. To avoid the risk of electric shock, do not open the unit.
Roland Dr. Beat DB-66
(Gerät, Typ, Bezeichnung)
For Canada CLASS B NOTICE
This digital apparatus does not exceed the Class B limits for radio noise emissions set out in the Radio Interference Regulations of the Canadian Department of Communications.
[CHANGING BATTERY]
When replacing battery, be sure to insert them correctly (to ensure correct polarity). [. . . ] Press the BEAT Button to select the beat you like. Press the START/STOP Button to start the rhythm and press it again
to stop.
* When 0 or 1 beat is selected in the step 2, hitting the TAP Button twice is enough. But when 2, 3, 4, 5 or 6 beat is selected, hit the TAP Button as many times as the number of selected beat, and next tapping will cause the Display to show the average tempo of the tapping. * At this stage if you return the Power/Mode Selection Switch to "METRONOME", the DB-66 is ready to work as a metronome in the last temp setting.
Display
7 segments, 5 characters
Speaker
1
SAMPLE SETTINGS
Metronome 8 beat
BEAT
Indicators
Tempo Indicator x2
Controls
TOTAL VOLUME Slider BEAT LEVEL Slider RHYTHM VOLUME Sliders ( , Power/Mode Selection Switch BEAT Button DOWN Button UP Button START/STOP (TAP) Button , , )
Try making more complicated rhythm like syncopation, 16 beat, etc. , by varying the Rhythm Volume setting.
Error Indications in Tap Mode
When the tempo you set is faster than 250 the Display will show (High) When the tempo you set is as slow as 30 to 34, the Display will show (Low) When the tempo you set is slower than 30, the tempo setting just before that will remain. [. . . ]


